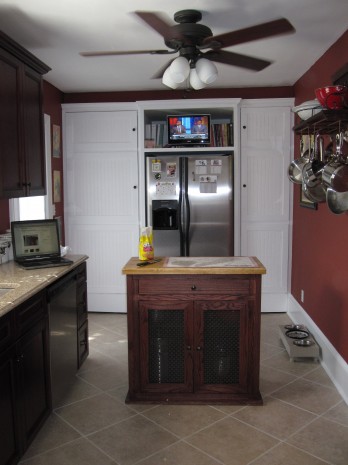
Like I’ve said before, I’m trying to get better at baking bread. Last week I tried a no-knead ciabatta recipe and was only somewhat pleased with the results. I decided I’d try again, so I made another batch of dough on Saturday. On Sunday afternoon, the dough was ready for the oven. I know what you’re thinking; what kind of man spends all day in the kitchen when there are football games on? Well, I addressed that dilemma when we remodeled the kitchen:

Thanks to my new TV and my island on wheels, I can watch football and cook at the same time.
I experimented with this batch of dough a little bit. In order to speed up the cooking time, I cut the dough in half. With one half, I made a ciabatta loaf. With the other half, I divided the dough again and made two small Italian bread loaves. I baked the Italian loaves at 425° for about 25 minutes. Here’s how they turned out:
The flavor was good, but the loaves were still too moist and dense on the inside:
We ate half of one loaf, but the only really good part of them was the bottom crust. I cooked the ciabatta loaf for about 40 minutes. The crust came out much better this time around:
But just like last time, the inside was more dense and chewy than I like. It went straight from the oven to the trash. I probably should have saved it to make breadcrumbs, but throwing it away felt pretty empowering at the time. I’m going to try the no-knead recipe one more time before I give up, but I’m going to bake it in a cast iron dutch oven like this recipe suggests (more on that method here).
I was determined to have some bread in the house, so I found this video recipe for easy French Bread. Here are the ingredients:
- 1/4 cup warm water
1 cup tepid water
1 teaspoon kosher salt
1 package yeast
3 1/2 cups unbleached flour
tablespoon cornmeal
1 beaten egg white
Click here to get the detailed instructions. If you look at the picture of the kitchen above, you can see that I had this video up on my laptop.
The recipe is pretty straight forward and the stand mixer does all the messy work. Here’s some advice: this is a pretty dry dough, so it won’t ball up very fast and gather on the dough hook like some of the stickier doughs. It’s easy to over work it, so turn off the mixer when most of the dough forms a ball. I covered the dough ball with a towel and set it outside in the sun on the front porch. The cats were very confused. After an hour, I flatted the dough and rolled it into a loaf. After about another hour, I painted it with an egg white and cut some slits in the top:
In the video, the instructor says you’ll know when to take the bread out when it sounds hollow when thumped. Mine never sounded hollow. I took it out when the crust became brown and very rigid. Here’s the finished product:
The crust tasted great and the inside wasn’t bad either:
I think I overworked the dough a bit. I’m just starting to get a feel for making dough. I’ve also switched to *King Arthur Unbleached Bread Flour, and that’s made a difference. If I can just perfect this one recipe, then I can start adding herbs, cheeses and various toppings. After that, I think baking will become more fun. And it is now, I feel a little foolish spending hours making a so-so loaf of bread when I can buy a perfectly cooked baguette at Publix for $2.99. And the upside of baking ends with artisan bread since, tragically, I was born without a fully-developed sweet tooth. So don’t expect too many dessert recipes on this site, unless of course I’m cooking something for the wife.
*Remember: if you’re going to cook with high-protein flour, you have to add a little extra water. King Arthur’s website says you should add about 2 teaspoons extra liquid for each cup of flour.


Pingback: The Evolution Of My Homemade Pizza | Chad Chandler