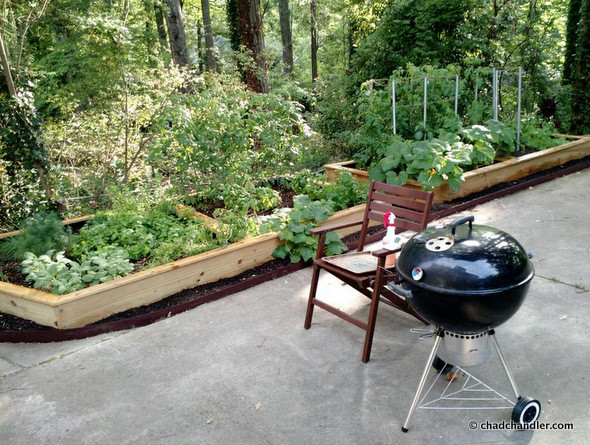
For years, I smoked on a cheap, portable, charcoal grill that was a hand-me-down from my father-in-law. When I moved to my new house in 2014, I treated myself to new Weber propane and charcoal grills. Despite the new gear, I clung to my old method of building a simple two-zone fire in the kettle. The standard two-zone set-up technically worked, but it required constant temperature checks, rotating of the meat, and the addition of fuel throughout the cook. It simply wasn’t very stable or efficient.
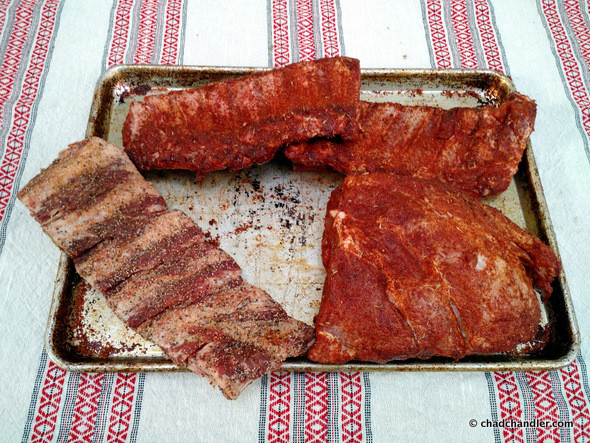
I’ve read about the fuse method (a.k.a. Minion method, coil/ snake) for years, but I never got around to trying it. I had a craving for some BBQ the other day, and I had a lot of work to do around the house, so I thought I’d finally try the fuse method to kill two birds with one stone. I bought a small pork shoulder, a rack of pork loin ribs, and some beef spare ribs. The pork got a Memphis-style rub. The beef got a basic beef rub.
I wanted to test the time and stability of the fuse method, so I started my cook at around 7:00 am. The idea was to have the ribs for lunch and the pulled pork for dinner. I wanted to go simple so that I could judge the fuse method on its merits and come up with variables to play with on the next cook if it was only partially successful.
This method is so easy. You just lay a chain of Kingsford original charcoal around the circumference of the kettle in a slightly overlapping array, being careful to leave a 1″ gap between the coals and the kettle wall. Then you place another layer in that gap, allowing the coals to rest against the kettle wall. Finally, you place a third layer on top of those rows of coals, trying to make them overlap the gaps in the layer beneath. Make sure to leave some empty space at one end of the fuse for hot coals.
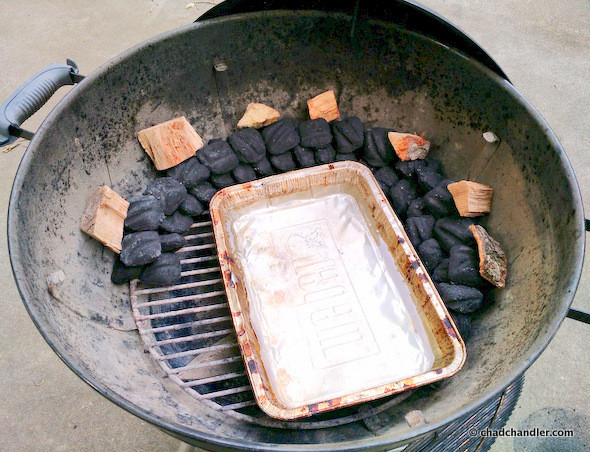
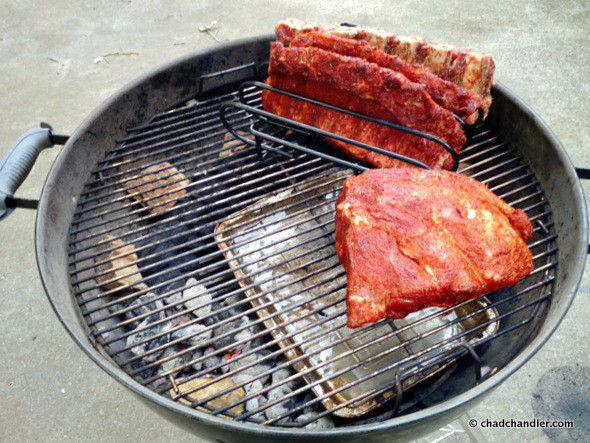
Next, place your chunks of flavor wood every few inches on top of the fuse. I alternated pecan (my favorite wood for anything low and slow) and apple chunks. Then light about 15 coals in a chimney starter. While they’re ashing over, add a water pan to the center of the bottom rack of the grill. This catches drips and acts as a heat sink. When the coals are white, pour them in a mound at the beginning of the fuse and toss a wood chunk on top. Place the cooking grate over the fuse, let the grill heat up, and then clean the grate. Finally, add the meat to the grill opposite the heat source. I laid the butt right on the grate but used a stand to separate the ribs.
Every hour or so, rotate the grill grate to keep the meat opposite the flame. When I do this, I also like to spray the meat with a mopping mixture of 3 parts apple juice to 1 part apple cider vinegar. My fuse burned at a consistent 250° with the vents wide open. I ended up closing the top and bottom vents by about a third each and the heat settled to an even 230°. I’ve never maintained such a consistent temperature before.
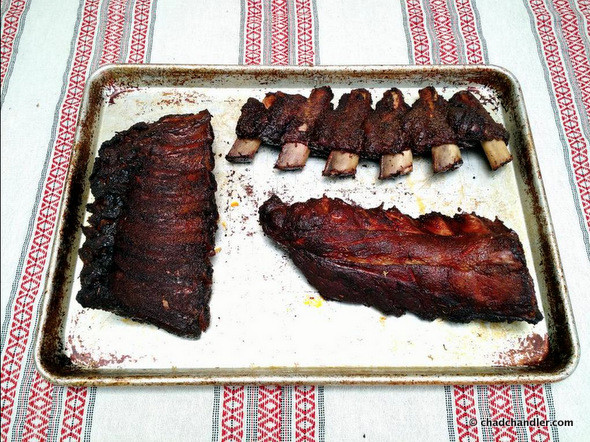
The beef spare ribs were a gift for a neighbor who complains that he can’t get good beef BBQ in South Carolina anymore. They were done in 4 hours. The baby backs were done in 5½ hours—just in time for lunch.

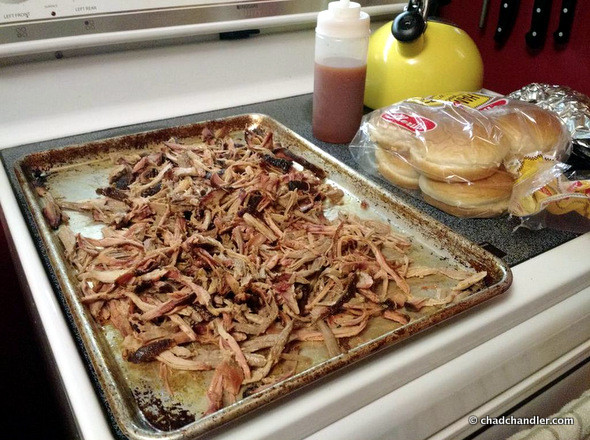
After ten hours, the grill temperature dropped to 200° and the fuse was about spent. The 6-pound pork shoulder was stalled at around 175°, so I wrapped it in foil and placed it in a 235° oven. This technique is known as the Texas crutch. The wife and I pulled and ate it for dinner a few hours later with a homemade, Western NC BBQ sauce.
Not only was the fuse method an overwhelming success, but it was incredibly simple. I definitely recommend this method to anyone with a 22½” kettle grill.
Notes
If I had used a round water pan, I probably could have added enough coals to keep the fuse burning for 14 total hours. Next time, I’ll use pecan wood and rotate something a little stronger (like hickory) for maximum flavor. I got a decent smoke ring and a great bark, but I didn’t get the deep, smoky flavor that I like in my BBQ.
Update 8/3/2015
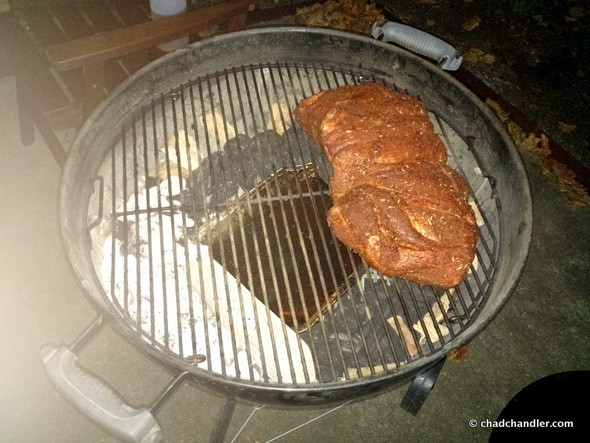
I smoked an 8-pound pork shoulder yesterday. I followed this pattern with a smaller water pan and coiled the briquettes all the way around, using an old brick as a barrier between the hot coals and the unlit tail of the fuse. I ran the vents mostly wide open and maintained 250°.
Here’s a picture of the grill at 5:30 am. I didn’t take any other pictures of the cooking process, but you can see some pictures of the finished pork here.
I’m fine with cooking at 250°, but the fuse burns faster this way. After about 8 hours, the last few coals were dying out and the water had completely evaporated. I set the grate on the ground and carefully added charcoal to make a new fuse on the unlit end. Then I blew on the embers to get the fuse going again. Once it was going, I poured more water in the pan, replaced the grate, and closed the lid. Just like that, the cook was back on.
In all, the cook took 11½ hours to hit 200°. It was tender enough that I probably could have pulled it at 195°, but I let it go. The bark was very dark and deep and I was afraid it might be acrid, but it turned out great.
Upon completion, I foiled the butt with a little apple juice/cider vinegar spray and put it in a cooler for 90 minutes while I finished up a project. Then I made some mac and cheese and pulled the pork. This was the best BBQ I’ve ever cooked. I actually ran out of pecan wood and finished with only apple, but it came out incredibly lean and moist with a deep smoke ring.
I think I’m going to front-load some hickory on the fuse and then alternate pecan and apple next time. I’ll go heat-only after reloading the fuse. It’s not really taking anymore smoke at that internal temperature anyway.


This is the first time I heard of the coil method and I am trying it right now, put the meat on about an hour ago, 225 constant degrees.
I am cooking large pork spare ribs. Do I use the same internal temp as the pulled pork – 195-200 degrees?
Sorry, Bob, I’m just now seeing this. Ribs are easier to gauge than pork shoulder. You can use an instant read thermometer to tell how hot the rib meat is (I think I pull them around 200), but a rule of thumb is that you take the rack off the grill when you can bend them over backwards. If you grab a bone and try to twist it, there should be a little give. The meat should not fall off the bone—that’s a symptom of overcooking despite the tired cliché—but the meat should have a lot of give.
If I save some for tomorrow, how would you store? I’m thinking, let cool down, wrap in foil and refigerate. Reheat in 250 oven tomorrow for an hour?
This is pretty much what you do. I usually toss them foil-covered in the oven on the lowest setting (170?) until they’re warm. Then I unwrap them for the last few minutes to dry them out. That said, I’ll sometimes throw them under the broiler for a quick heating. Any way that keeps them from getting greasy works.